
INTRODUCTION
All of our sidecars are designed to be fitted at home by anyone with reasonable mechanical skill. They do not just clip on and go, fitting can be time consuming and will be different for every motorcycle. This page aims to give a good basic guide and cover many of the problems a home fitter may encounter. Ultimately it is the person doing the fitting that must be responsible for the security and safety of the finished motorcycle and sidecar combination. We are more than happy to offer additional advice if needed. Many customers bring their bike to our workshop and discuss fitting before purchasing their sidecar. By doing this we can make suggestions for clamp location, flag up any potential problems and suggest solutions.
CHOOSING THE RIGHT MOTORCYCLE
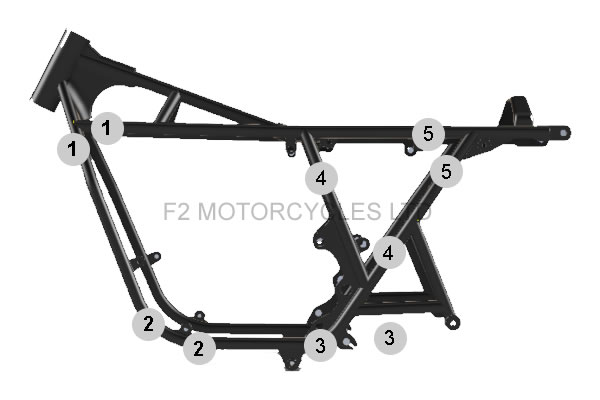
Some motorcycles are easier to fit a sidecar to than others. Our sidecar fitting system is only designed for tubular steel cradle frames. That is a frame made entirely of steel tubes which form a complete cradle round the front and under the engine. Ideally this should have two tubes in front of the engine, although some lighter bikes such as the Royal Enfield 500 may only have one tube. Most twin shock bikes and most custom cruisers would have this type of frame. The frame steering geometry of the original bike should not be at all sporty, so again most retro or classic twin shock bikes as well as most cruisers are correct. A long bike will generally be more stable in a straight line than a short one. A low center of gravity is more stable when cornering, so again cruisers win. It's good to have an under stressed engine with plenty of torque. So for ease of fitment and a very stable easy ride a cruiser would be a good choice. There is however one potential issue to look out for when choosing a cruiser, this is trail. Some cruisers have excessive trail as standard, great for stability but it can make the steering very heavy. Before buying a cruiser quickly check on line and find out the manufacturers rake and trail figures, ignore the rake, but look at the figure for the trail, 100 mm to 120 mm will be stable and light to steer, 121 mm to 140 mm will be very stable but starting to get heavy, 141 mm to 160 mm really will be heavy unless you have very wide bars, above 161 mm and you should probably pick a different bike. Retro and Classic bikes make a good choice, offering straight forward fitment and slightly livelier handling usually having between 100 mm and 115 mm trail
BEARINGS AND TYRES
Adding a sidecar to any motorcycle is going to highlight any existing weaknesses in the suspension, steering head bearings, swing arm bushes, etc. Before fitting a sidecar check the motorcycle carefully. Any slight play in the wheel, swing arm, or steering bearings will cause low speed wobbles and will wear to a dangerous condition very quickly once the additional stress of a sidecar is added.
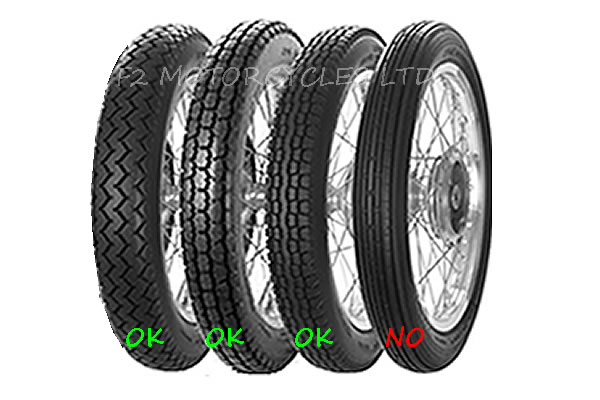
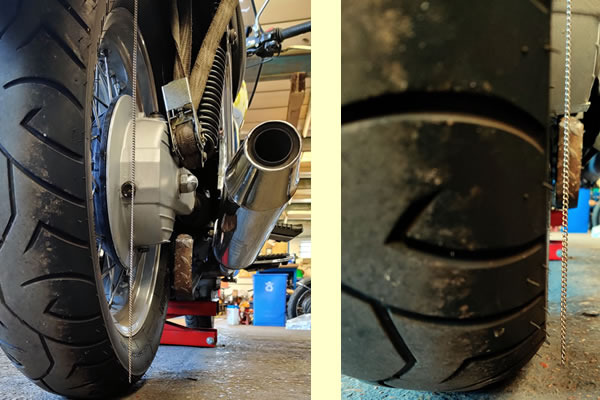
Take a look at the tyres, they do not need to be anything special but ideally they should be flattish on the top to get as much contact area as possible. Ribbed tyres really mess up a heavy fast combo and should never be used, if the front tyre has long lines in the tread going inline with the bike change it before the sidecar is fitted.
Think about the suspension as well. If it is adjustable, adjust it to the hardest settings. If it still feels soft even as a solo bike, consider getting aftermarket springs which are stiffer than the originals. Sometimes the non adjustable front forks can be pre-loaded by adding a spacer above the spring inside the forks. Do not rush out and spend a fortune on leading link forks, before even trying the standard set up.
CLAMP LOCATION
Our frame clamps (part # SCV/3, SCV/4 and SCV/10) are designed to fit steel frame tubes with a diameter between 25mm and 40mm. The clamps should be as far apart as possible to spread the load as evenly as possible across the motorcycle frame. Remember we are very happy to offer advice and suggestions. The unique clamp is both strong and compact. We recommend the use of 5 fitting points.

TOOLS NEEDED
You are definitely going to need two straight things slightly longer than the motorcycle, some supports to raise them off the ground, a plumb-line and a tape measure. It is also handy to have spirit levels, adjustable stands, some way to measure very accurately, some ratchet straps, an adjustable bike stand and a few bits of thin metal to act as wedges. As you can see from this picture the straight edges go each side and as close as possible to the motorcycle or sidecar. The front wheel of the motorcycle should be perfectly straight ahead.
SUPPORT THE MOTORCYCLE
Sit on your motorcycle to see how much the suspension drops with your weight. Use ratchet straps to slightly compress the suspension so the motorcycle remains at this level when you get off. Support the motorcycle securely with both wheels on the ground and leaning just slightly away from the sidecar. Place the sidecar next to the bike and support it so the chassis is level.

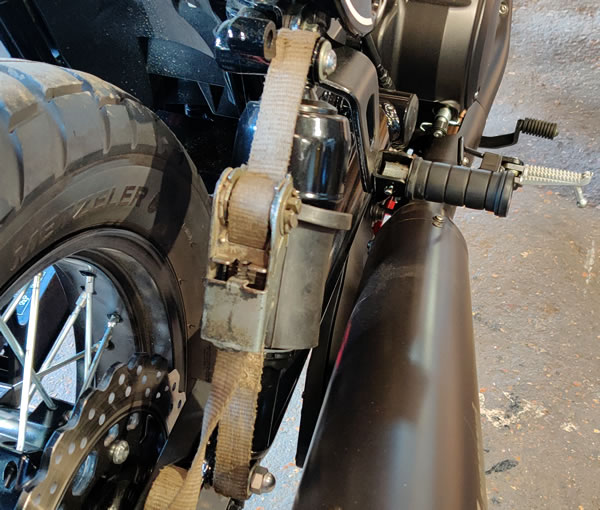
AXLE LEAD
The first measurement to look at is how much the sidecar axle is in front of the rear wheel axle of the motorcycle as shown in this picture. This needs to be between 250 and 350 mm, less axle lead (250 mm) will produce a sidecar outfit which turns quickly but is less stable at speed so only recommended for slower bikes. It will also require slightly more toe in. More axle lead will produce a sidecar outfit that is slightly heavier to turn but it will be more stable at speed so recommended for faster bikes. It will also require less toe in. For an average modern bike capable of exceeding the UK speed limit when fitted with a sidecar a good starting point would be 18% and 22% of the wheel base.
TOE IN
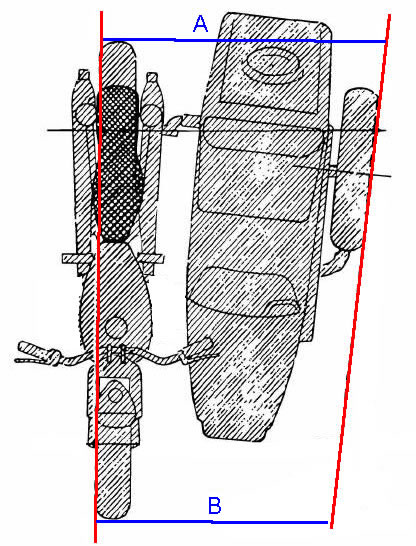
On the bike side measure accurately and adjust the straight edge so it is 25 mm away from the wheel rims. Assuming the front and rear wheel are perfectly in line, just use the rear wheel to set the straight edge. Rear of rear wheel, front of rear wheel. Then do the same on the sidecar wheel, rear of sidecar wheel, front of sidecar wheel. Finally measure the distance at right angles to the bike just behind the rear wheel (marked A) and again just in front of the front wheel (marked B). This is the amount the vehicle toes in over the whole length. There are no hard and fast rules for this but a good starting point is 15 to 25 mm. So to be clear the distance between your two straight edges should be 15 to 25 mm greater at the back than it is at the front. If you had near 350 mm axle lead set the toe in close to 15mm and if you had near 250 mm axle lead set the toe in close to 25 mm.
LEAN OUT
This must be measured with the steering straight ahead and the measurements are usually carried out on the rear wheel. I use thin chain, but a washer attached to some cotton will work. Hold the free end of the cotton near the top of the wheel so the weighted end hangs down on the outside of the wheel. Note where the cotton touches at the top and measure the gap between the cotton and the similar spot at the bottom of the wheel. Over the height of the wheel the lean out should be 4 to 6 mm. If the sidecar will be used most of the time with a heavy load this lean out should be increased to 8 to 10 mm. Once the toe in and lean out are set. Tighten everything and remove the supports from the motorcycle. Release the ratchets previously used to compress the suspension.

This site uses Google Analytics - we do not collect any personalised data. © F2 Motorcycles Ltd - No part of this site may be used without permission.